

Build a Computer for Architecture School or Professional Practice
UPDATED FOR 2023! Check out my new Revit tutorial site for my Revit Computer Parts List!
The information and fundamentals in THIS post are still relevant, though the parts list is now five or six years old.
*****************************************************************************************
This post is about how (and why) to build your own computer for your architecture work.
Check out the videos here:
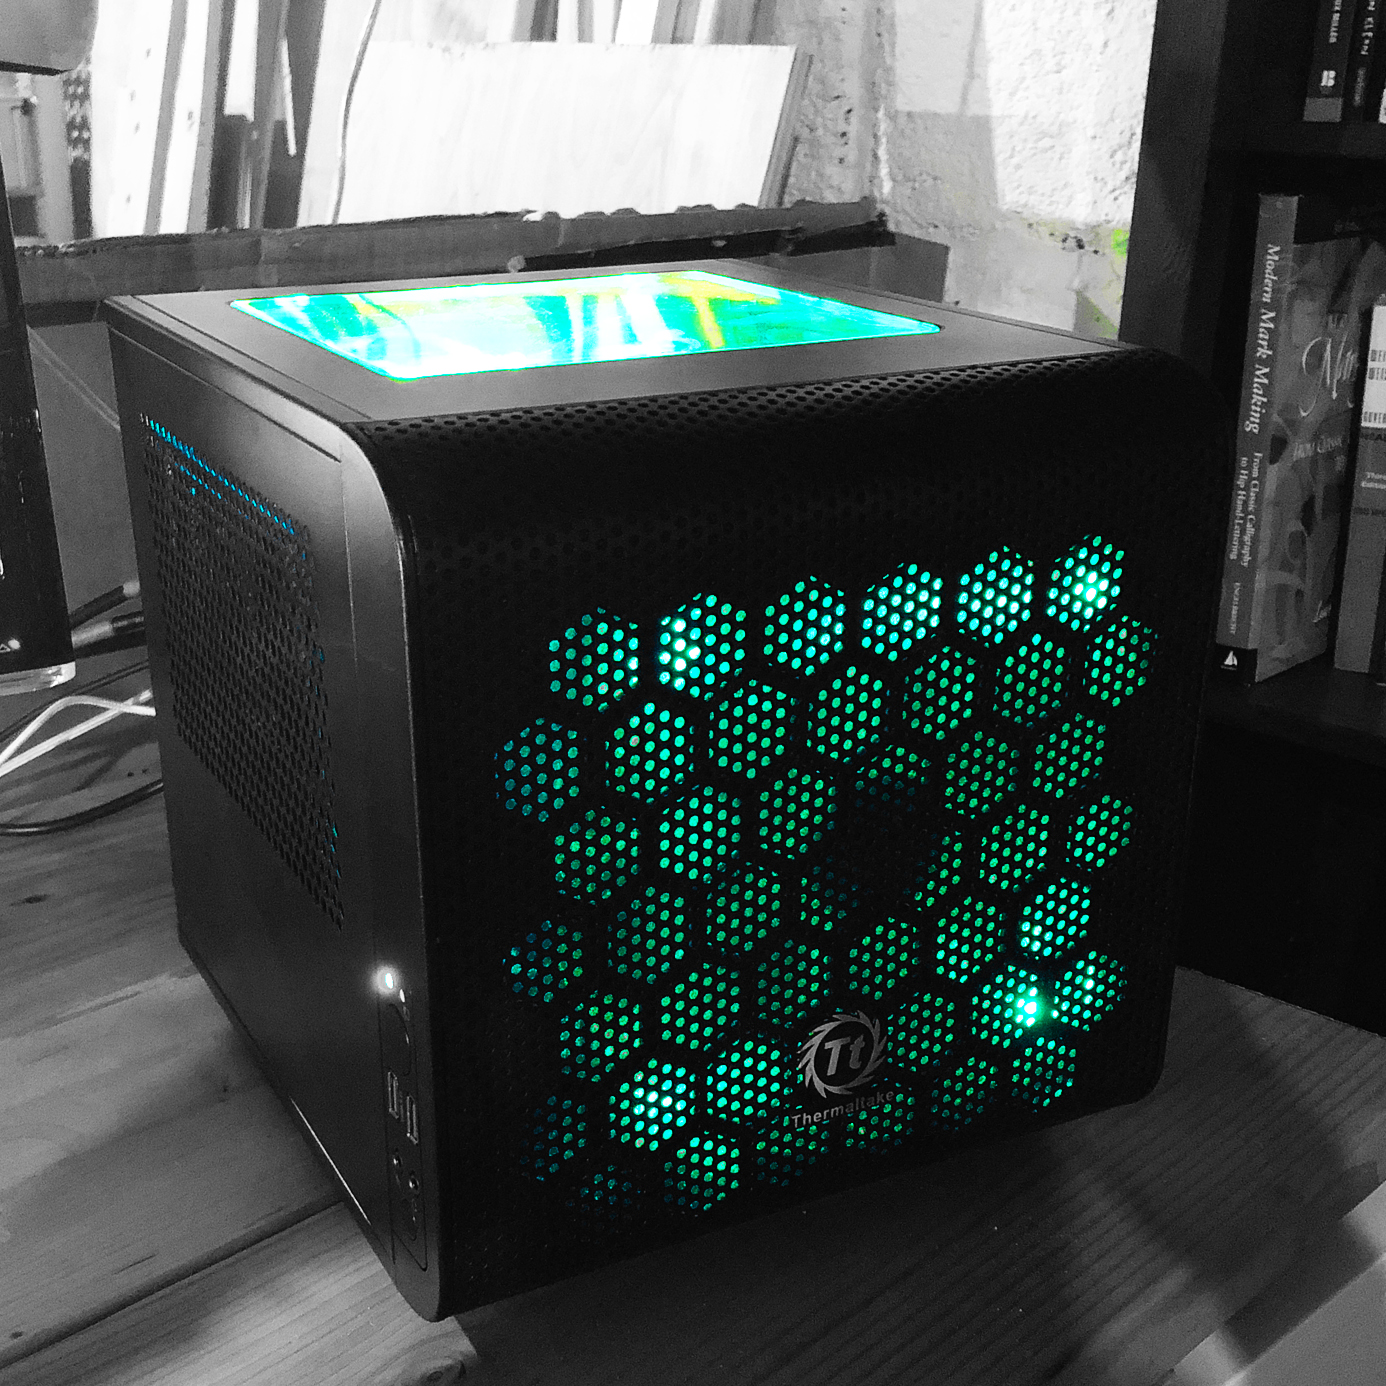
Completed build sitting on my desk.
Part 1: Why Build Your Own Computer for Architecture
Part 2: How to Build Your Own Computer for Architecture
It's time to update my home desktop, which I use for Revit, 3DS Max, VRay, Photoshop, After Effects, Illustrator and InDesign, among others. You know, the usuals. I just ordered all the parts this weekend, and wanted to share how I made my selections and why I chose to build this computer myself. My previous computer lasted more than six years and is actually still running strong. I expect this new build to be a huge improvement and last me just as long. If you are a student or full-time professional architect, using this parts list will get you a powerful computer that will last you a long time. More pictures and a YouTube video coming as soon as I get a chance to put this thing together. For now, read on about how I chose the parts and what you should look for when creating your own computer.
Build your own computer?
I wasn't too far into grad school when I realized my MacBook wasn't going to cut it for the intensive rendering and photoshop work I was starting to learn. Plus, I really didn't know too much about computers then, and as a lifelong Mac user I began shopping for a PC for the first time ever. Interestingly, I happened to cross paths with a younger student who did know a lot, so I asked his opinion on the latest Alienware laptops. His response was that I should just build my own computer.

Components waiting to be installed
Build my own computer? I had no idea what he was talking about. I literally thought that meant I would have to solder microchips together and I really didn't even know where to begin. It turns out that “assemble” is probably a better term. You buy all the different parts that make up a computer, and then put them together. As I learned more about the process, I realized the student was right, and I haven't bought a computer since.
WHY TO BUILD YOUR OWN ARCHITECTURE COMPUTER
There are definitely some good reasons to buy a ready-made computer, but here are four reasons why I switched to building my own.
#1: You can get more for your money. When you pick and choose your own parts and assemble them yourself you will usually end up with a more powerful machine than if you bought one for the same price. If your budget is $1200, you could assemble a better set of parts than you would be able to purchase already put together for the same amount.
#2: You can customize it exactly how you want. Instead of searching forever for a computer with the exact specifications you want, you pick all the parts yourself, so you get only what you want and don't have to include any extras you don't need.
#3: You learn a lot about the link between the hardware in your computer and the software you use. This is a good thing, and I would say a minimum requirement if your interest is rendering and visualization.
#4: You can update (some of) the individual pieces over the years to improve functionality. The computer I'm replacing now was built in December 2011, so it's lasted more than six years. About three years ago I replaced the graphics card and installed more memory, which was a lot cheaper than buying a whole new computer.
WHAT PARTS DO I NEED TO GET FOR MY NEW COMPUTER?
So what exactly is a computer and how do you build one? The basics are you that you need a processor, memory, a video card and storage. Those things all get installed on a motherboard and you put the entire assembly into a case. When I first began learning about this stuff I found the How to Build a Computer series from NewEgg, and I still watch it today.
My goal for this new computer was to get the best performance I could for about $1100. If you want to build the same one it's going to be closer to $1500 because I will be reusing a few parts from my existing computer. But in the $1500 range this will be a powerful computer that will last you a long time. You can easily spend way more, or way less. In the detailed description below I provide some “Level Down” options that will cut the total price. When I shop for a new computer, I don't automatically get the most powerful one I can find. I first consider what I'm using. Since it's been six years, I am going to see a huge performance boost regardless. It's like going from a bicycle to an Accord or an Audi. Yeah the Audi is better, but when you're starting on a bike the Accord is still a pretty big improvement.
Before we get to the detailed explanation, here's the full parts list:
PROCESSOR: i7-7700K http://amzn.to/2FcyYiq
MOTHERBOARD: ASRock Z70M-ITX LGA 1151 http://amzn.to/2H1KFc1
RAM: Corsair Vengeance 16GB http://amzn.to/2oFaHvg
GPU: EVGA GeForce GTX 1060 SC Gaming http://amzn.to/2FfZEPp
POWER SUPPLY: Seasonic 550W 80+ Gold http://amzn.to/2oG5qUa
CPU FAN: Noctua NH-L9i http://amzn.to/2FbE56z
M.2 SSD: WD Black Performance 256GB http://amzn.to/2oHurOJ
HDD: Seagate Barracude 2TB http://amzn.to/2FQdOrw
CASE: Thermaltake Core V1 http://amzn.to/2H2bQ6T
CASE FAN: Apevia 200mm http://amzn.to/2FbUDeG
CASE FANS: Apevia 80mm http://amzn.to/2oFzA9N
WINDOWS 10 Pro 64 Bit: http://amzn.to/2FcngII
BACKUP DRIVE: http://amzn.to/2DjLVFe
how do i choose the best parts?
The BIGGEST thing to be aware of when choosing parts is compatibility. You can't select random pieces and expect them to work together. You have to carefully choose parts that share required connections, interfaces and size. There are an insane number of ways to configure your computer, with every part you choose influencing all the other parts you might pick next. You have to start somewhere though, and for many people they start with the processor. For this build I am starting with the processor AND a spare case I want to use.
Processor
Intel i7-7700k LGA 1151
http://amzn.to/2FcyYiq
This is the core of your computer, where all the hard work gets done. The two primary manufacturers are Intel and AMD. I have built computers using both brands, but for my workstations I go with Intel. The two primary models you will see are i7 and i5. You can run Revit (and all the others) just fine on an i5 and it will save you some money. If you think you’re going to get into rendering you definitely want the i7 because they have hyperthreading. (This has nothing to do with Hyperfine!) Hyperthreading essentially allows one processor to be fed more than one task at a time. When you are rendering an image each core of your computer makes a bucket, which is what we call those squares that bounce around the screen. So a quad-core computer will give you four buckets. If your quad-core is an i7 it will be hyperthreaded and give you eight buckets. For all my workstations I have always used an i7 and I'm sticking with that here.

Level down (± $90)
Intel i5-7600k
http://amzn.to/2H1P66G
Motherboard
ASRock Z70M-ITX LGA1151
http://amzn.to/2H1KFc1

Motherboard
The motherboard is the interface between all your components and you. It connects the components and allows you to plug in mouse, keyboard, speakers, etc. Every processor has a different socket type, so you absolutely have to make sure your motherboard and processor are compatible. For the i7-7700K I chose, I need to find a motherboard with an LGA-1151 socket. The motherboard size, or form factor, is another compatibility check. Since I already have my case, I need a motherboard with a specific form factor that will fit into the case. I am going with a compact case, so I need a small motherboard, the m-itx form factor. After that you start picking which features you want, such as how many RAM slots, M.2 drive connections, built-in wifi, etc.

Case
Thermaltake Core V1
http://amzn.to/2H2bQ6T (BLACK)
http://amzn.to/2Fe12BN (white)
The case holds everything together, and is the outward appearance of your computer. It has to be functional, but we probably want it to look good as well. Every case will be classified with a different form factor, which will match your motherboard. I already have this Thermaltake Core V1 case sitting around, so I want to use it. It's a small case that can sit on my desk, it's sturdy and has some front USB 3.0 ports (which tie in to the motherboard). It also has a plastic side window so you can see into the computer. Since I started with this case, and it is classified as M-ITX size I had to make sure I chose a compatible motherboard. (The entire reason I had this case sitting around is because I did't double check the size on a previous build and assumed it was bigger…so I got a motherboard that didn't fit.)

RAM
Corsair Vengeance 16GB (2x8gb)
http://amzn.to/2oFaHvg
This is your memory and you can never have enough. More specifically, this is your computer’s short term memory, from where it likes to run programs. When you launch Revit, or Photoshop or whatever, that waiting time you experience while the program opens is the computer writing the program onto the RAM. Once that’s done you can begin work and you’re running the program off of your RAM. 8 GB is minimum. 16GB is good. 32GB is really nice. My computer at work has 16GB, the computer I'm replacing has 32GB. They both work fine.
Your motherboard will have a fixed number of connections and a specific size of RAM it needs. The dominate size right now is DDR4-288 Pin, which my motherboard requires. The motherboard has two slots for RAM, so I am buying two 8GB sticks, for a total of 16GB. You also want to check the standard speed your motherboard/processor can use. In both cases this is DDR4-2400, so that's what I got. Higher numbers mean faster. The RAM I am replacing is DDR3-1333.
Level Down (± $80)
Same stuff but only 8GB (2x4gb)
http://amzn.to/2FPmChe
GPU
EVGA GeForce GTX 1060 SC Gaming
http://amzn.to/2FfZEPp
The Graphics Processing Unit (GPU) is your video card. This component is designed specifically to create the images you see on your screen. You processor and motherboard can do this, but a separate GPU will do this much better. This will also be one of the more expensive components in your build, and with the small case you may pay a premium for a compact GPU. I updated my original computer with a new GPU about three years ago, so I will be keeping that for this new build, and not actually using this GTX 1060 I have chosen for you. When selecting a GPU you want to look for memory size, bit depth and output connections. For the first two, more is better. For connections, try to coordinate this with the monitors you have, but that's not a deal breaker because adapters are cheap. One other specification to look for is CUDA cores (Nvidia) and Stream Processors (Raydeon). These are the GPU's processors, similar to the CPU cores discussed above. Again, more is usually better.

POWER SUPPLY
Seasonic FOCUS Plus Series 550W 80+ Gold Full Modular
http://amzn.to/2oG5qUa
The power supply, obviously, provides the power to all these components. A few things to look out for. First, the total wattages. Use this power supply calculator on Newegg.com to choose the correct size (wattage size, not physical size). Then choose the physical size. ATX is the standard, and many cases can handle an ATX size supply, even smaller cases like the Core V1 we are using. It is a good idea to get a power supply that has an 80+ rating, which is an efficiency rating system for power supplies. Finally you can choose whether or not you want a modular power supply. This will determine if the cords that plug into your different components are permanently attached or not. Full modular means the individual cords are NOT attached, so you only plug in the ones you need. This is great for saving space.

CPU Heatsink
Noctua Low-Profile NH-L9I
http://amzn.to/2FbE56z
Your processor generates a lot of heat, so it needs it's own cooling system. This is typically a metal heatsink that sits directly on the top of the processor and absorbs heat. That heat is then dissipated into the case through coils and a fan. You will also need to buy some thermal paste. This is about $5, see the Other Items section below. There are also more expensive water cooling options. I'm going with a standard air cooling for this build. Again, there are some compatibility concerns. One, you need a heatsink that will fit your processor. Look for the same socket type as your processor and motherboard. Two, the fan has to be able to fit in your case. Less of an issue with larger cases. I chose a small case, so I'm going with a low profile heatsink.

M.2 SSD
WD Black 256GB Performance
http://amzn.to/2oHurOJ
Solid state drives (SSD) are much faster storage devices than the typical hard drives they are replacing. It's common in gaming computers to have a smaller SSD for programs and a larger Hard Drive Disk (HDD) for all your storage. The computer I'm replacing has a 256GB SSD, which is where I installed Windows and all my programs. I also have a 1TB hard drive for my working files, pictures, music, etc. I'm doing the same thing again, but the SSD is now replaced with an M.2 drive. M.2 refers specifically to the size of the drive, but M.2 drives offer increased connection speeds over the original SSDs. For comparison, a typical HDD can read/write information at about 120mb/s. A typical SSD is in the range of 600mb/s. An M.2 drive with PCI-E 3.0 x 4 connection can be 60x faster than an SSD. Of course, we need to check compatibility. Again, M.2 only refers to the form, the shape of the drive. It needs to be marked NVMe and PCI-E to be able to get the full speed benefits and to install windows (I think). You also need an M.2 socket on your motherboard, and that socket has to support PCI-E. If the socket doesn't, your M.2 will probably still work, but not at it's max speed. Of course, this is a nice option, but is not actually required. However, SSDs and M.2 drives allow you to start windows and launch your programs in seconds. If you don't get the M.2 drive you just install everything on one HDD like many computers.

Level Down (± $100) Don't get it at all.
Hard Disk Drive
Seagate BarraCuda 2TB
http://amzn.to/2D4Wdcp
This is your primary hard drive, used for storing all your files. Look for a drive that has the amount of storage you want, and try to find one that's 7200 rpm, as opposed to 5400. This is common, just double check before you buy. I ended up getting two of these 2TB drives, and I'm going to install them with a RAID 1 setup, which means all my files will be saved to each hard drive separately. I'll only have 2TB of storage, instead of 4, but I will have a built-in backup in case one of the drives fails.

Windows 10 Pro 64-Bit
http://amzn.to/2FcngII
You need an operating system, and if you're building a computer for architecture it is probably going to be running Windows. In the past, you needed the Pro version because the Home edition had limits on how much RAM you could use. Looks like that's not the case anymore, but I stuck with the Pro version anyway. Spending $150 on your operating system isn't fun, but you have to do it. If you're a student you might have discounted versions at a campus bookstore.
Case Fan 80MM (x2)
http://amzn.to/2oFzA9N
You need to install fans in the case to help move air through and out of the case. Review the specs on your case to see how many and what size fans can be installed. Also check your motherboard for how many fans can be plugged in. For the Core V1 case we're using I can install (2) 80mm fans. My motherboard only has one fan header, so we also need a fan splitter hub. The fans I chose have green LED lights, this is purely aesthetic.
Case Fan
APEVIA 200mm
http://amzn.to/2FbUDeG
The case can also fit up to a 200mm fan at the front, and it comes with one installed. I'm getting a new one anyway, mostly because it also has the green LED lights.
Level down (± $20)
Don't get it. The Core V1 comes with a 200mm fan installed.
Backup Hard Drive
Western Digital Elements 4TB
http://amzn.to/2DjLVFe
Backup drives provide additional storage AND safety for your files. With the low price of storage, there's really no excuse not to have one. When picking a backup drive make sure you find one with a USB 3.0 connection for fast transfer speeds, then choose the amount of storage you want. A desktop drive will be slightly larger and will require have to be plugged in to an outlet. A portable drive will be powered through the USB, and will be portable, but will likely have slower transfer speeds. I am going with a 4TB desktop drive.
HOW TO BUILD A COMPUTER FOR ARCHITECTURE
That's the entire parts list I went with, and things for you to consider when selecting parts for your build. Check back soon as I'll be posting more pictures and another post about the assembly process.
Looking for other entrepreneurial ideas and concepts?
Our New Entrepreneurship Resource Page
